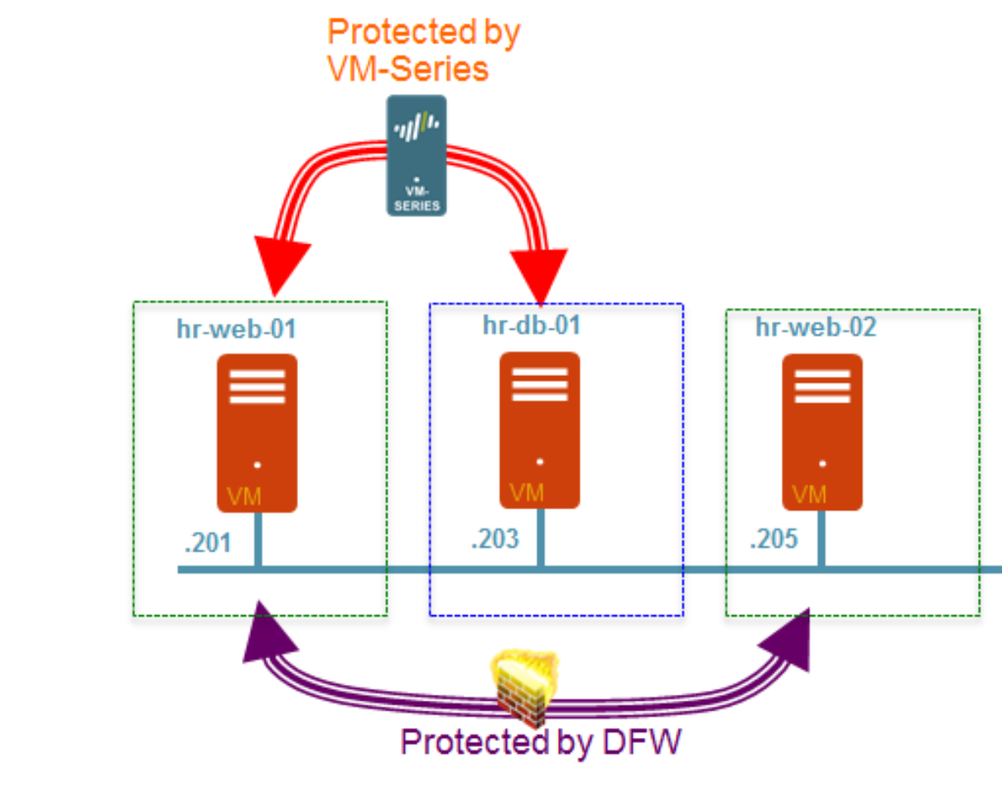
The idea is to deploy the Palo Alto Networks firewall as a service on a cluster of VMware ESXi servers where the NSX has been enabled. The objective is to protect the East-West traffic in your VMware environment and "steer" the FW rules between the NSX "native" Firewall and the Palo Alto Firewall. We are doing this integration in order to be able to later enforce different type of Security Policies depending on whether we want to protect the traffic within the VMs of the same Tier (intra-tier), or between different Tiers (Inter-Tier). Best practice would be:
- Inter-tier traffic (Web server to App or DB server) is protected by PaloAlto Networks VM-series firewall which provides advanced security capabilities with its single pass architecture in the form of App-ID, Content-ID, and User-ID. On a diagram below a PA NGFW is protecting the traffic between the HRs Web and DB Servers.
- Intra-tier traffic (web server to web server) is protected by NSX DFW which provides near line rate performance for L2-L4 security functions. On a diagram below, NSX DFW is protecting the traffic between the two HRs Web servers.
Components
Before we proceed with the detailed explanation of how to deploy and configure the environment, let's clear out what are the components of the VM-Series for NSX Solution, how they work together and what are the benefits. The components of the integrated solution are the following:
- vCenter Server, the centralized management tool for the vSphere suite. The vCenter server is required to manage the NSX Manager and the ESXi hosts in your data center. This joint solution requires that the ESXi hosts be organized into one or more clusters on the vCenter server and must be connected to a distributed virtual switch.
- NSX Manager, the VMware Networking and Security platform, or simply said - SDN. The NSX Firewall and the Service Composer are key features of the NSX Manager. The NSX firewall is a logical firewall that allows you to attach network and security services to the virtual machines, and the Service Composer allows you to group virtual machines and create policy to redirect traffic to the VM-Series firewall
- Panorama, centralized management tool for the Palo Alto NGFW (Next Generation Firewalls). In this solution, Panorama works with the NSX Manager to deploy, license, and centrally administer configuration and policies on the VM-Series firewalls for NSX. Panorama is used to register the VM-Series firewall for NSX as the Palo Alto Networks NGFW service on the NSX Manager. This allows the NSX Manager to deploy the VM-Series firewall for NSX on each ESXi host in the ESXi cluster. When a new VM-Series firewall is deployed in NSX, it communicates with Panorama to obtain the license and receives its configuration/policies from Panorama. Panorama must be able to connect to the NSX Manager, the vCenter server, the VM-Series firewalls and the Palo Alto Networks update server.
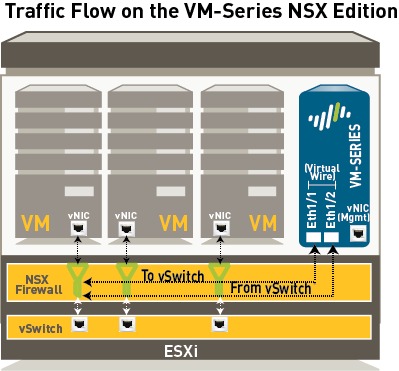
- VM-Series Firewall for NSX (VM-100, VM-200, VM-300, VM-500, and VM-1000-HV, support NSX). The VM-Series firewall for NSX is the VM-Series firewall that is deployed on the ESXi hypervisor. The integration with the NetX API makes it possible to automate the process of installing the VM-Series firewall directly on the ESXi hypervisor, and allows the hypervisor to forward traffic to the VM-Series firewall without using the vSwitch configuration. The VM-Series firewall for NSX only supports virtual wire interfaces. On this firewall, ethernet 1/1 and ethernet 1/2 are bound together through a virtual wire and use the NetX dataplane API to communicate with the hypervisor. Layer 2 or Layer 3 interfaces are neither required nor supported on the VM-Series firewall for NSX, and therefore no switching or routing actions can be performed by the firewall.
Ports/Protocols you need to enable for the Network Communication:
- Panorama: To obtain software updates and dynamic updates, Panorama uses SSL to access updates.paloaltonetworks.com on TCP/443; this URL leverages the CDN infrastructure. If you need a single IP address, use staticupdates.paloaltonetworks.com.
- The NSX Manager and Panorama use SSL to communicate on TCP/443.
- VM-Series Firewall for NSX: If you plan to use Wildfire, the VM-Series firewalls must be able to access wildfire.paloaltonetworks.com on port 443. This is an SSL connection and the App-ID is PaloAlto-wildfire-cloud.
- The management interface on the VM-Series firewall uses SSL to communicate with Panorama over TCP/3789.
- vCenter Server The vCenter Server must be able to reach the deployment web server that is hosting the VM-Series OVA. The port is TCP/80 by default or App-ID web-browsing.
Which version of Panorama, vSphere, NSX and PA-VM should I use?
- Panorama: For a long time the VM-1000-HV was the only available PaloAlto VM Firewall for this integration. Don't get me wrong, it's a great option, but if cost of the solution is something that you might worry you - I've got some good news. Since Panorama 8.0 all the PA-VM versions are supported (VM-100, VM-300, VM-500 and of course VM-1000). It gets even better - you can start with the VM-100, and upgrade from there if you need more capacity in the future.
- NSX: For my lab I used NSX 6.2.5. I recommend you go directly for 6.3.x, all the concepts explained here apply.
Integration
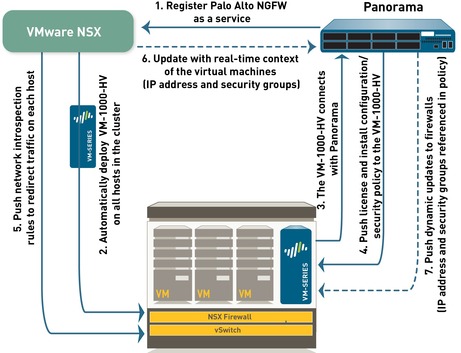
Now that we know the components, let's see how it all fits together. NSX Manager, ESXi servers and Panorama work together to automate the deployment of the VM-Series firewall, as shown in the diagram below. Lets get deeper into this...1.1 Install the VMware NSX Plugin
Before you start the integration, you need to make sure that your NSX is operational, NSX Controllers in the "Connected" state (vSphere > NSX > Installation > Management). I strongly advise you to upgrade your Panorama to 8.0.x, if you haven't already. In my Lab I used only 2 hosts at first. Once I had everything fully functional, I added the other hosts.You need to Download the Plugin from here (you will need a Palo Alto Support account):
https://support.paloaltonetworks.com/Updates/SoftwareUpdates/1904
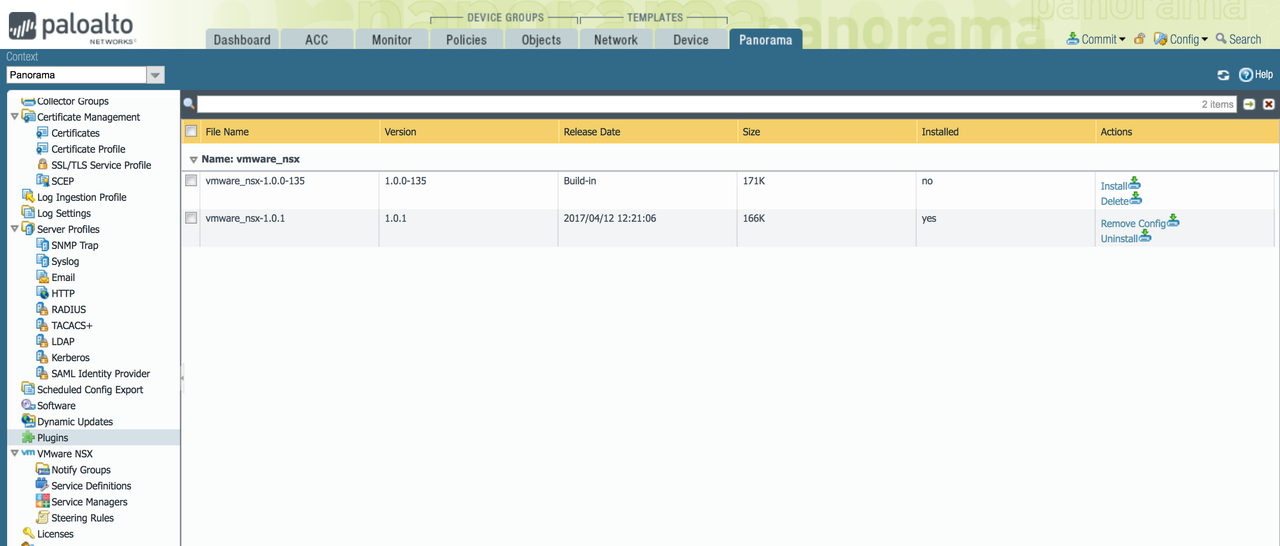
Log in to Panorama, and go to "Panorama Tab > Plugins". Upload the Plugin, and press "Install". A new "VMware NSX" sub-menu will appear on the left, as shown below.
Next you need to set up access to the NSX Manager. Select Panorama > VMware NSX > Service Managers and click Add. Enter the Service Manager Name and the other required info. If you do this step correctly, on the NSX Manager, this name will be displayed in the Service Manager column on Networking & Security > Service Definitions > Service Managers.
IMPORTANT: The ampersand (&) special character is not supported in the NSX manager account password. If a password includes an ampersand, the connection between Panorama and NSX manager fails.
TIP: Once the Services are Synchronized, in PANOS 8.0 you won´t be able to see the Service Manager Status. Don´t panic, this is Ok. As long as you see the new Service Manager has been configured in NSX (Networking & Security > Service Definitions > Service Managers) - you´re good to go.
In Panorama you will also see a new Administrator user called "__vmware_nsx" has been configured. In NSX try to edit the newly created "Service Manager". You will notice that the credentials are associated to this new user.
1.2 Create Template(s) and Device Group(s) on Panorama
To manage the VM-Series firewalls for NSX using Panorama, the firewalls must belong to a device group and a template. Device groups allow you to assemble firewalls that need similar policies and objects as a logical unit; the configuration is defined using the Objects and Policies tabs on Panorama. Use templates to configure the settings that are required for the VM-Series firewalls to operate on the network and associate; the configuration is defined using the Device and Network tabs on Panorama (Groped as Templates). And each template containing zones used in your NSX configuration on Panorama must be associated with a service definition; at a minimum, you must create a zone within the template so that the NSX Manager can redirect traffic to the VM-Series firewall.Go to Panorama > Device Groups, and click Add. Name your Device Group something Intuitive, like NSX Firewalls. After the firewalls are deployed and provisioned, they will display under Panorama > Managed Devices and will be listed in the device group.
Now add a template or a template stack. Select Panorama > Templates, and click Add. After this you need to create the Zone for each template (be sure to set the interface Type to Virtual Wire.). Panorama creates a corresponding service profile on NSX Manager for each qualified zone upon commit.
IMPORTANT: For a single-tenant deployment, create one zone. If you have multi-tenant deployment, create a zone for each sub-tenant.
Now you need to add a new Service Definition. This is basically used for Panorama to know how to provision a PaloAlto Firewall on the Hosts where it is needed. Select Panorama > VMware NSX > Service Definitions.
TIP: Before you define the Service Definition, you need to place your PA-XXX.ova file on a Web Server. I know, not as cool as the Architects of the solution imagined it, but still... it´s logical that Panorama needs an Image Repository with different types of PA-VM, because a big environment might require a variety of different Firewalls.
Once the Service Definition is created, Select Panorama > VMware NSX > Service Manager and click the link of the service manager name. Under Service Definitions, click Add and select your service definition from the drop-down.
Now you need to Add the authorization code to license the firewalls. I hope you already have the Auth Code by now. Select Panorama > Device Groups and choose the device group you associated with the service definition you just created. Under Dynamically Added Device Properties, add the authorization code you received with your order fulfillments email and select a PAN-OS software version from the SW Version drop-down. When a new firewall is deployed under NSX and added to the selected device group, the authorization code is applied and the firewall is upgraded to the select version of PAN-OS.
IMPORTANT: You need to Install a License Deactivation API Key in Panorama before you proceed with the FW Deployment in the ESXi Cluster. This is important before you want your Panorama to take care of the Licenses using the Auth-Code.
admin@Panorama> request license api-key set key bea265bdb4c832793b857cfa1bf047845dc82e3b3c1b18c1b2e59796147340eb
API Key is successfully set
admin@Panorama>
2. Register the VM-Series Firewall as a Service on the NSX Manager
2.1 The first step is to register the Palo Alto Networks NGFW as a service on the NSX Manager. The registration process uses the NetX management plane API to enable bi-directional communication between Panorama and the NSX Manager. Panorama is configured with the IP address and access credentials to initiate a connection and register the Palo Alto Networks NGFW service on the NSX Manager. The service definition includes the URL for accessing the VM-Series base image that is required to deploy the VM-Series firewall for NSX, the authorization code for retrieving the license and the device group and template to which the VM-Series firewalls will belong. The NSX manager uses this management plane connection to share updates on the changes in the virtual environment with Panorama.2.2 Deploy the VM-Series automatically from NSX —The NSX Manager collects the VM-Series base image from the URL specified during registration and installs an instance of the VM-Series firewall on each ESXi host in the ESXi cluster. From a static management IP pool or a DHCP service (that you define on the NSX Manager), a management IP address is assigned to the VM-Series firewall and the Panorama IP address is provided to the firewall. When the firewall boots up, the NetX data plane integration API connects the VM-Series firewall to the hypervisor so that it can receive traffic from the vSwitch.
2.3 Establish communication between the VM-Series firewall and Panorama : The VM-Series firewall then initiates a connection to Panorama to obtain its license. Panorama retrieves the license from the update server and pushes it to the firewall. The VM-Series firewall receives the license (VM-1000-HV) and reboots with a valid serial number.
2.4 Install configuration/policy from Panorama to the VM-Series firewall : The VM-Series firewall reconnects with Panorama and provides its serial number. Panorama now adds the firewall to the device group and template that was defined in the service definition and pushes the configuration and policy rules to the firewall. The VM-Series firewall is now available as a security virtual machine that can be further configured to safely enable applications on the network.
2.5 Push traffic redirection rules to NSX Manager : On Panorama, create security groups and define network introspection rules that specify the guests from which traffic will be steered to the VM-Series firewall. See Integrated Policy Rules for details.
2.6 Receive real-time updates from NSX Manager : The NSX Manager sends real-time updates on the changes in the virtual environment to Panorama. These updates include information on the security groups and IP addresses of guests that are part of the security group from which traffic is redirected to the VM-Series firewall. See Integrated Policy Rules for details.
2.7 Use dynamic address groups in policy and push dynamic updates from Panorama to the VM-Series firewalls : On Panorama, use the real-time updates on security groups to create dynamic address groups, bind them to security policies and then push these policies to the VM-Series firewalls. Every VM-Series firewall in the device group will have the same set of policies and is now completely marshaler to secure the SDDC. See Policy Enforcement using Dynamic Address Groups for details.
3. Create Steering Rules
IMPORTANT: The default policy on the VM-Series firewall is set to deny all traffic, which means that all traffic redirected to the VM-Series firewall will be dropped. Have this in mind before you activate PA NGFW in your VMware environment.Panorama serves as the single point of configuration that provides the NSX Manager with the contextual information required to redirect traffic from the guest virtual machines to the VM-Series firewall. The traffic steering rules are defined on Panorama and pushed to NSX Manager; these determine what traffic from which guests in the cluster are steered to the Palo Alto Networks NGFW service. Security enforcement rules are also defined on Panorama and pushed to the VM-Series firewalls for the traffic that is steered to the Palo Alto Networks NGFW service.
Steering Rules —The rules for directing traffic from the guests on each ESXi host are defined on Panorama and applied by NSX Manager as partner security services rules.
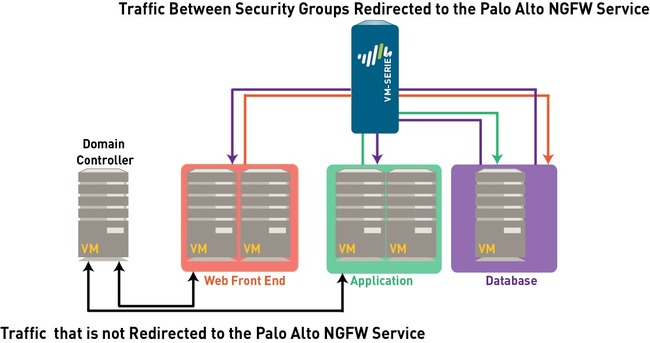
For traffic that needs to be inspected and secured by the VM-Series firewall, the steering rules created on Panorama allow you to redirect the traffic to the Palo Alto Networks NGFW service. This traffic is then steered to the VM-Series firewall and is first processed by the VM-Series firewall before it goes to the virtual switch.
Traffic that does not need to be inspected by the VM-Series firewall, for example network data backup or traffic to an internal domain controller, does not need to be redirected to the VM-Series firewall and can be sent to the virtual switch for onward processing.
Rules centrally managed on Panorama and applied by the VM-Series firewall —The next- generation firewall rules are applied by the VM-Series firewall. These rules are centrally defined and managed on Panorama using templates and device groups and pushed to the VM-Series firewalls. The VM-Series firewall then enforces security policy by matching on source or destination IP address—the use of dynamic address groups allows the firewall to populate the members of the groups in real time—and forwards the traffic to the filters on the NSX Firewall.
Policy Enforcement using Dynamic Address Groups
Unlike the other versions of the VM-Series firewall, because both virtual wire interfaces (and subinterfaces) belong to the same zone, the VM-Series firewall for NSX uses dynamic address groups as the traffic segmentation mechanism. A security policy rule on the VM-Series firewall for NSX must have the same source and destination zone, therefore to implement different treatment of traffic, you use dynamic address groups as source or destination objects in security policy rules.Dynamic address groups offer a way to automate the process of referencing source and/or destination addresses within security policies because IP addresses are constantly changing in a data center environment. Unlike static address objects that must be manually updated in configuration and committed whenever there is an address change (addition, deletion, or move), dynamic address groups automatically adapt to changes.
Any dynamic address groups created in a device group belonging to NSX configuration and configured with the match criterion _nsx_
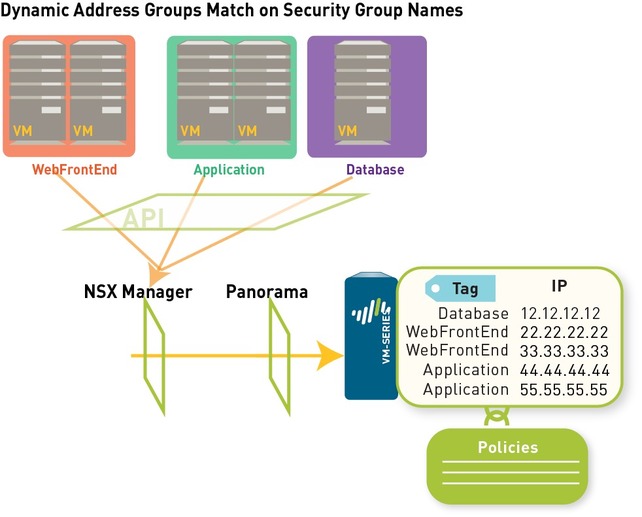
If, for example, you have a multi-tier architecture for web applications, on Panorama you create three dynamic address groups for the WebFrontEnd servers, Application servers and the Database servers. When you commit these changes on Panorama, it triggers the creation of three corresponding security groups on NSX Manager.
CONCLUSION: Panorama Dynamic Address Group = NSX Security Group
On NSX Manager, you can then add guest VMs to the appropriate security groups. Then, in security policy you can use the dynamic address groups as source or destination objects, define the applications that are permitted to traverse these servers, and push the rules to the VM-Series firewalls.
Each time a guest is added or modified in the ESXi cluster or a security group is updated or created, the NSX Manager uses the PAN-OS REST-based XML API to update Panorama with the IP address, and the security group to which the guest belongs.
When Panorama receives the API notification, it verifies/updates the IP address of each guest and the security group and the service profile to which that guest belongs. Then, Panorama pushes these real-time updates to all the firewalls that are included in the device group and notifies device groups in the service manager configuration on Panorama.
On each firewall, all policy rules that reference these dynamic address groups are updated at runtime. Because the firewall matches on the security group tag to determine the members of a dynamic address group, you do not need to modify or update the policy when you make changes in the virtual environment. The firewall matches the tags to find the current members of each dynamic address group and applies the security policy to the source/destination IP address that are included in the group.
Is this a Multi Tenant environment? For enabling traffic separation in a multi-tenancy environment, you can create additional zones that internally map to a pair of virtual wire sub-interfaces on the parent virtual wire interfaces, Ethernet 1/1 and Ethernet 1/2.



Very nice post Mat! Lots of useful information and attention to detail.
ReplyDelete